A Python tool that wraps Greaseweazle and SugarConvDsk to create .dsk and .scp images of Tatung Einstein physical 3" disks.
Type
Utility
Supported OS
Cross Platform
Instructions
Einstein Disktool Installation Instructions
Pre-requisite Hardware Configuration
In order for this to work an Einstein disk drive must be connected to a greazeweasel, which in turn must be connected to your computer, it is important to note the following when setting this up:-
The Einsteins disk drive requires a 12 volt power supply, the Greaseweazels power connector only provides 5 volts and so should not be used as it risks damaging your equipment.
TIP: if unsure of how best to power your drive, you could power it from the Einstein itself. If its an internal drive leave the power cable alone and then remove the data cable from the motherboard and connect that to your greaseweazel, when ready simply turn on the Einstein to power the drive.
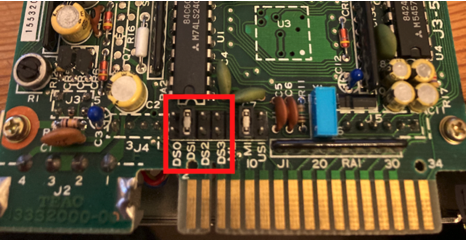
You now need to identify your Disk Drives ID. If you are using the primary disk drive of a working Einstein the ID is 0, if it is the second drive then its ID is mostly likely 1, in all other cases you should check the drive before continuing:-
In order to check the disk drive, remove the four drive screws that held the drive in its drive bay and then outer drive enclosure.
Locate the jumpers on the drive (on mine they are above the edge connector) and note the drive id, an example is shown below and as can be seen this drive is set to DS1 (ID 1).
Once the disk drive is connected to an appropriate power supply, before turning it on you need to perform the actions detailed in the next section.
Software Configuration and Usage
Download the zip file to your computer and extract it to your desired location.
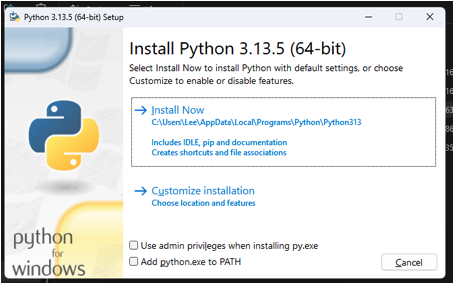
Navigate to the directory you extracted the files to and run python-3.13.5-amd64.exe. the box below will appear - Now click on the tick box labelled “ Add python to PATH” at the bottom of the window followed by “install now” - when the product has finished installing click on “Close”.
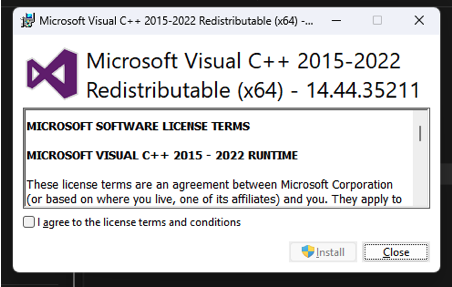
In the same directory run vc-redist.x64.exe the box below will appear - click in the box next to “I agree to the license terms and conditions” then click on “install”, you may be asked “if asked do you want to allow this app to make changes to your device” if so click on yes - when the product has finished installing click on “Close”.
You are now ready to run the program but first you need to connect your drive to the Greaseweazel and in turn the Greaseweazel to your computer.
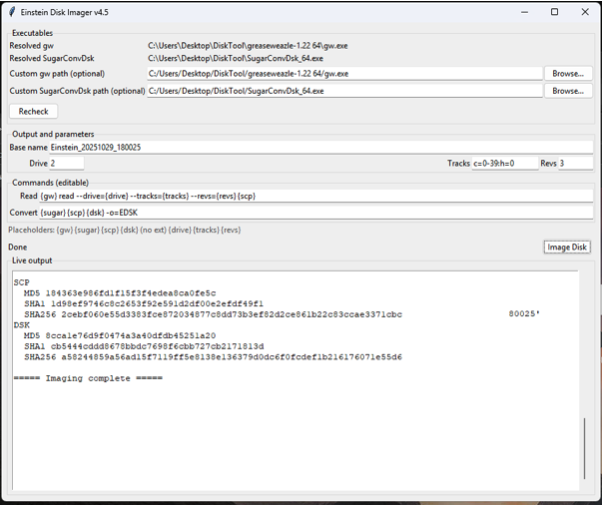
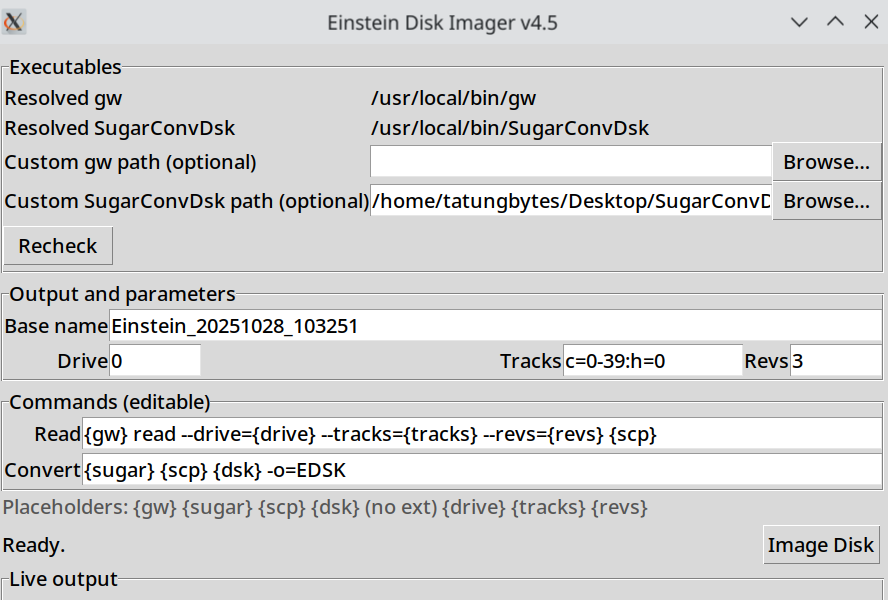
Make sure both the Greazeweazel and Einstein drive have power and then from the directory you extracted the files into run disktool.py, the box below will appear.
Click on the browse button to the extreme right of the custom gw path and navigate Navigate to the directory you extracted the files to, then click on the Greaseweazel sub directory and select the GW.exe file and click on open.
Click on the browse to the extreme right of the sugarconvdsk path and navigate to where you extracted the files to, select the sugarConvDsk_64.exe file and click on open.
Now click on the Recheck button immediately below the two lines you have just updated and in the Live output window at the bottom of the window both items should now be ticked
In the “Base name” field enter the destination where you would like your disk created and name of the disk you want to create. I.e. C:\Desktop\boot disk
In the “Tracks” field set it to c=0-79:h:0 for 80 track discs and c=0-39 for 40 tracks disks. If unsure then simply create the disk using the first method, if that does not work then repot the process using the second method.
In the Drive field enter the Disk Drive ID you identified in the “Pre-requisite Hardware Configuration” section above.
Insert the Einstein disk you want to convert.
Click on the “Image Disk” button and progress should now appear in the live output window and complete with the “====Imaging Complete=====“ message.
Navigate to the destination you entered in step 6 and you should now see it contains a file named boot disk.dsk (the name you selected in step 6 above).
You have now successfully created your disk image and can load it via your gotek on an original Einstein or into an Einstein Emulator.